Visible to Intel only — GUID: tue1511995485128
Ixiasoft
1.1. Acronyms and Definitions
1.2. Recommended System Requirements
1.3. Installation Folders
1.4. Boot Flow Overview
1.5. Getting Started
1.6. Enabling the UEFI DXE Phase and the UEFI Shell
1.7. Using the Network Feature Under the UEFI Shell
1.8. Creating your First UEFI Application
1.9. Using Arm* DS-5* Intel® SoC FPGA Edition (For Windows* Only)
1.10. Pit Stop Utility Guide
1.11. Porting HWLIBs to UEFI Guidelines
1.12. Tera Term Installation
1.13. Minicom Installation
1.14. Win32DiskImager Tool Installation
1.15. TFTPd64 By Ph.Jounin Installation
1.16. Revision History of Intel® Arria® 10 SoC UEFI Boot Loader User Guide
1.5.1. Compiling the Hardware Design
1.5.2. Generating the Boot Loader and Device Tree for UEFI Boot Loader
1.5.3. Building the UEFI Boot Loader
1.5.4. Creating an SD Card Image
1.5.5. Creating a QSPI Image
1.5.6. Booting the Board with SD/MMC
1.5.7. Booting the Board with QSPI
1.5.8. Early I/O Release
1.5.9. Booting Linux* Using the UEFI Boot Loader
1.5.10. Debugging an Example Project
1.5.11. UEFI Boot Loader Customization
1.5.12. Enabling Checksum for the FPGA Image
1.5.13. NAND Bad Block Management
Visible to Intel only — GUID: tue1511995485128
Ixiasoft
1.5.4.1. Creating an SD Card Image on Linux
- Open a terminal window.
- Make a copy of the GSRD into your working directory.
- Download the pre-built SD card image from here.
- Use the Arria10_Linux_SDCard.tar.gz as a base image and modify the image to boot with UEFI boot loader.
- Expand the compressed Linux SD card image.
$ tar xzvf Arria10_Linux_SDCard.tar.gz - Insert the SD card reader into your machine. Enable the San Disk SDDR-113 by navigating to Devices > USB Devices > SanDisk SDDR-113 [9412].
Figure 32. Enabling SanDisk SDDR-113 [9412]

- Determine the device associated with the SD card on the host by running the following command before and after inserting the card in the reader:
$ cat /proc/partitionsFigure 33. SD Card Determination Using cat CommandAlternatively, you can accomplish the same through the following menu selection on your machine: Applications > System Tools > Disk Utility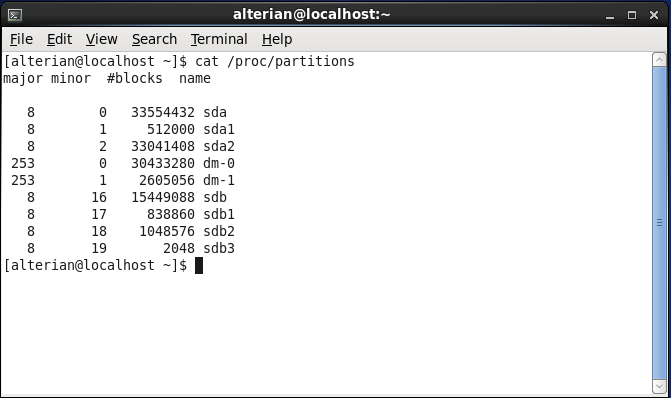 Figure 34. SD Card Determination Using Disk UtilityThis selection opens a Disk Utility Window:
 Figure 35. Disk Utility Window
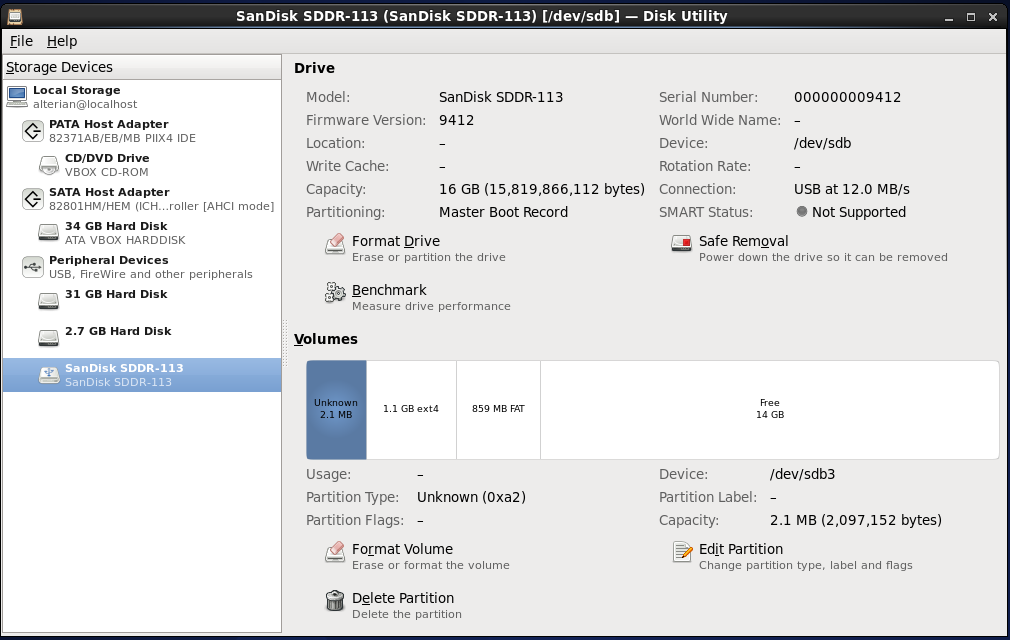
- Use the dd utility to overwrite the Arria10_Linux_SDCard.img file with the generated PEI.ROM and write the image into the SD card.
$ cd <your_uefi_directory>/uefi-socfpga

$ dd if=Build/PEI.ROM of=/<your_SDCard_directory>/ Arria10_Linux_SDCard.img bs=512 seek=2048 conv=notrunc
Figure 36. Image Overwrite Using dd Utility
- Insert the SD card reader into your host machine and use the dd utility to write the image into the SD card.
$ sudo dd if=/<your_SDCard_directory>/ Arria10_Linux_SDCard.img of=/dev/sdb bs=1MFigure 37. Image Write Using dd Utility