Visible to Intel only — GUID: lro1431976733141
Ixiasoft
1. Nios II Custom Instruction Overview
2. Custom Instruction Hardware Interface
3. Custom Instruction Software Interface
4. Design Example: Cyclic Redundancy Check
5. Introduction to Nios® II Floating Point Custom Instructions
6. Nios II Floating Point Hardware 2 Component
7. Nios® II Floating Point Hardware (FPH1) Component
8. Document Revision History for Nios II Custom Instruction User Guide
4.1.1. Setting up the Environment for the CRC Example Design
4.1.2. Opening the Component Editor
4.1.3. Specifying the Custom Instruction Component Type
4.1.4. Displaying the Custom Instruction Block Symbol
4.1.5. Adding the CRC Custom Instruction HDL Files
4.1.6. Configuring the Custom Instruction Parameter Type
4.1.7. Setting Up the CRC Custom Instruction Interfaces
4.1.8. Configuring the Custom Instruction Signal Type
4.1.9. Saving and Adding the CRC Custom Instruction
4.1.10. Generating and Compiling the CRC Example System
6.1. Overview of the Floating Point Hardware 2 Component
6.2. Floating Point Hardware 2 IEEE 754 Compliance
6.3. IEEE 754 Exception Conditions with FPH2
6.4. Floating Point Hardware 2 Operations
6.5. Building the FPH2 Example Hardware
6.6. Building the FPH2 Example Software
6.7. FPH2 Implementation of GCC Options
6.8. Nios II FPH2 and the Newlib Library
6.9. C Macros for round(), fmins(), and fmaxs()
Visible to Intel only — GUID: lro1431976733141
Ixiasoft
6.5. Building the FPH2 Example Hardware
To instantiate the FPH2 component in your system, in Platform Designer, locate the Floating Point Hardware 2 component in the Project area of the Component Library. The FPH2 component is located under the “Embedded Processors” group in the Component Library.
The FPH2 component editor, shown in the figure below, allows you to selectively enable any of several groups of floating point custom instructions. By default, all instructions are enabled.
Figure 22. FPH2 Component Editor

In most cases, you should leave all floating point custom instructions enabled. However, for the MAX 10 device family in certain configurations, you might need to disable the Roots group.
MAX 10 devices cannot support the FPH2 square root instruction in the following configurations:
- Dual configuration mode
- Compressed configuration mode
- External RAM initialization disabled
The square root instruction uses a lookup table, requiring initialization that the MAX 10 cannot support in these configurations. Turn off the Roots option if you are targeting a MAX 10 device in one of these configurations.
When you disable one of the floating point instruction groups, software must implement the functions in that group (in this case, square root) if they are required. The BSP generator automatically creates this support. Refer to "Building the FPH2 Example Software" for details.
The figure below shows Platform Designer with Nios II connected to the FPH2. The FPH2 has two slaves (s1 and s2). One slave is for the combinatorial custom instruction and the other slave is for the multi-cycle custom instruction. Connect both slaves to the Nios II custom_instruction_master by clicking the dot in the connections patch panel. The following figure shows how the connection should look.
Figure 23. FPH2 Component in Platform Designer
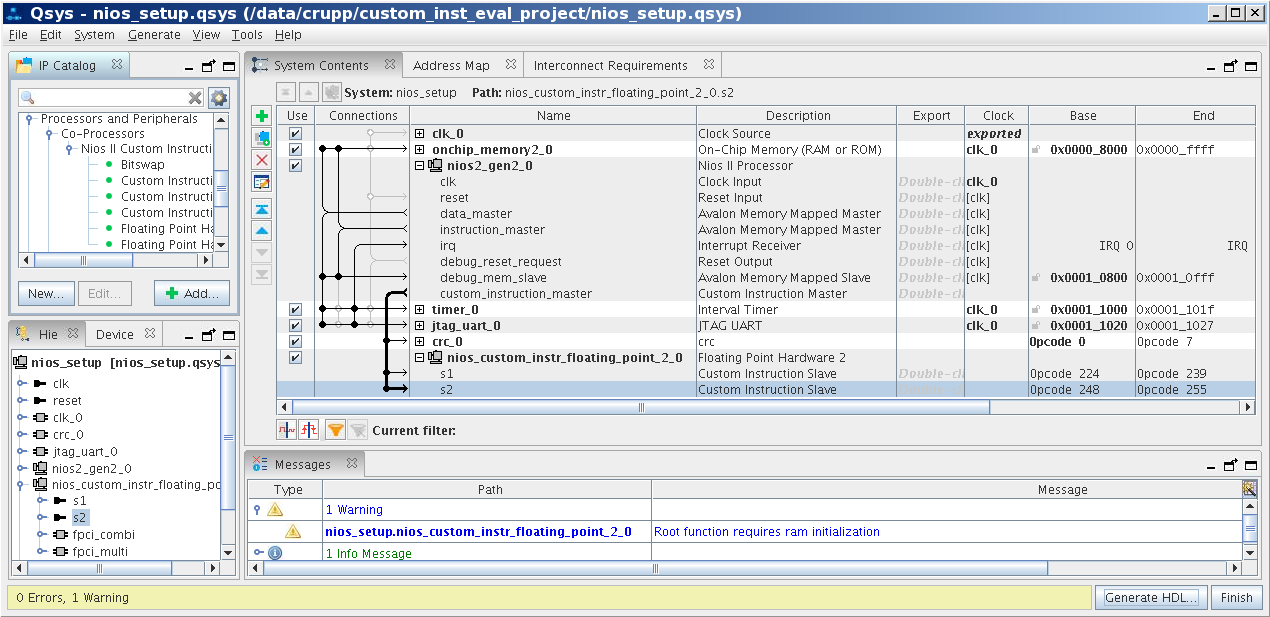
The example in the figure above targets a MAX 10 device. Note the warning message, reminding you that there could be an issue with RAM initialization for the square root function.
After connecting the FPH2 to the Nios II, generate your system in Platform Designer as you normally would. Then use the Intel® Quartus® Prime software to compile the generated RTL, or use an RTL simulator, like ModelSim* - Intel® FPGA Edition, to perform simulations.
Note: If you use the Nios II software build tools (SBT) to create your software projects, the BSP generator creates a custom newlib library for your floating point hardware. If you modify your floating point hardware configuration, you must regenerate and rebuild your BSP to ensure that newlib is built correctly. For details, refer to "Building the FPH2 Example Software".