Visible to Intel only — GUID: vwe1522871899267
Ixiasoft
1. Overview
2. CvP Description
3. CvP Topologies
4. Design Considerations
5. CvP Driver and Registers
6. Understanding the Design Steps for CvP Initialization and Update Mode in Intel® Stratix® 10
7. Intel® Stratix® 10 Configuration via Protocol (CvP) Implementation User Guide Archives
8. Document Revision History
5.3.1. Vendor Specific Capability Header Register
5.3.2. Vendor Specific Header Register
5.3.3. Intel Marker Register
5.3.4. User Configurable Device/Board ID Register
5.3.5. CvP Status Register
5.3.6. CvP Mode Control Register
5.3.7. CvP Data Registers
5.3.8. CvP Programming Control Register
5.3.9. CvP Credit Register
Visible to Intel only — GUID: vwe1522871899267
Ixiasoft
6.2.3.1. Creating a Reserved Core Partition
The following instructions are for creating a reserved core partition from the base revision:
- To elaborate the hierarchy of the design, click Processing > Start > Start Analysis & Synthesis.
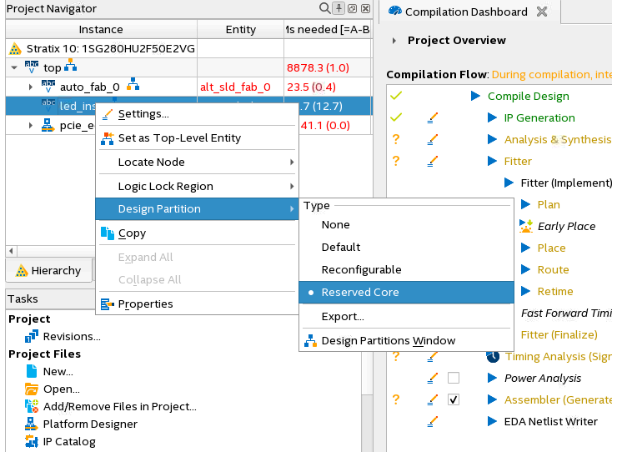
- Right-click an instance in the Project Navigator and click Design Partition > Reserved Core. A design partition icon appears next to each instance you assign.
Figure 16. Creating Design Partition from Project Navigator
 This setting corresponds to the following assignment in the .qsf:
set_instance_assignment -name PARTITION <name> \ -to <partition hierarchical path> - When defining the partition, select Reserved Core for the partition Type. Ensure that all other partition options are set to default values.
This setting corresponds to the following assignment in the .qsf:
set_instance_assignment -name RESERVED CORE ON -to \ <partition hierarchical path> - To export the finalized static region from this base revision compile and to use in subsequent CvP update revision compile, in the Post Final Export File cell, double-click the entry for root_partition and type root_partition.qdb.
Figure 17. Design Partitions Window
 This setting corresponds to the following assignment in the .qsf:
set_instance_assignment -name EXPORT_PARTITION_SNAPSHOT_FINAL \
root_partition -to | -entity top