Web Invoice Self Help
Browse through the navigation tabs for the information you are interested in.
- A tool used by Indirect Material Suppliers to submit invoices.
- Eliminates mail float.
- Reduces invoice administrative cost (paper and mail).
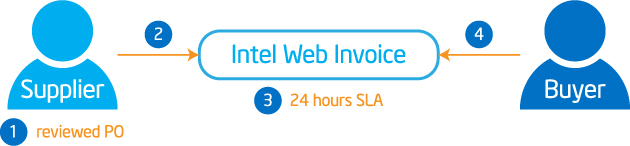
| Step | Action |
| 1 | Intel Supplier reviewed and acknowledge PO in Intel Web PO tool. |
| 2 | Supplier create invoice in Intel Web Invoice tool. |
| 3 | Invoice created will become viewable by Intel Buyer. |
| 4 | Buyer review and proceed accordingly. |
Web Invoice cannot be used for billing Intel if,
- Your PO is in a closed status.
- You are requesting payment in a currency other than the PO currency.
- You are submitting tax-only or freight-only invoices.
- You do not invoice Intel against a purchase order (non-PO suppliers).
- You are a Direct Materials Supplier using the ERS process (Evaluated Receipt Settlement).
| Step | Action |
| 1 | Go to supplier.intel.com. |
| 2 | Click on Supplier Sign-In link. |
| Result: The Intel Login page is displayed. | |
| 3 | Enter your Username and Password. |
| 4 | Click Sign In button. |
| Result: The Supplier Information page will be displayed. | |
| 5 | Click Intel Web Invoice link. |
| Result: The Web Invoice tool will be displayed. |
| Step | Action |
| 1 | Go to supplier.intel.com. |
| 2 | Click on Supplier Sign-In link. |
| Result: The Intel Login page is displayed. | |
| 3 | Enter your Username and Password. |
| 4 | Click Sign In button. |
| Result: The Supplier Information page will be displayed. | |
| 5 | Click Manage My Account > Application Access link |
| Result: The Application Access page will be displayed | |
| 6 | Select checkbox to request for additional permissions.
|
| 7 | Click Next. |
| Note: You might be prompted to provide additional information. | |
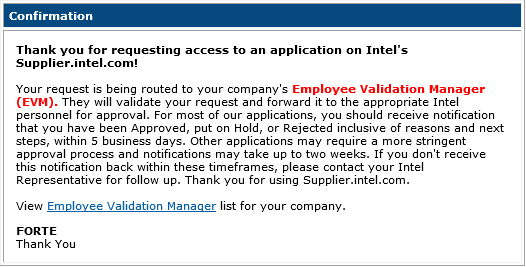
| Result: The confirmation message will be displayed. Your application is now subject to your EVM’s approval.
|
| Step | Action | |||||||||
| 1 | Go to supplier.intel.com. | |||||||||
| 2 | Click on Supplier Sign-In link. | |||||||||
| Result: The Intel Login page is displayed. | ||||||||||
| 3 | Enter your Username and Password. | |||||||||
| 4 | Click Sign In button. | |||||||||
| Result:The Supplier Information page will be displayed. | ||||||||||
| 5 | Click Manage My Account > Check Request Status link. | |||||||||
Result: The Check Request Status page will be displayed. The date and status of your request will be displayed.
|
| Step | Action |
| 1 | Go to supplier.intel.com. |
| 2 | Click on Supplier Sign-In link. |
| Result: The Intel Login page is displayed. | |
| 3 | Enter your Username and Password. |
| 4 | Click Sign In button. |
| Result: The Supplier Information page will be displayed. | |
| 5 | Click Manage My Account > Upgrade to Standard (Full) Registration link. |
| Result: The Upgrade to Standard (Full) Registration page will be displayed.
|
|
| 6 | Click Begin button. |
| 7 | Select the checkbox for Intel® Web Suite (Invoice/PO/Payment Tracker/ASN/Forecast) - Suppliers Only.
|
| 8 | Click Next button. |
| Result: The access request form will be displayed. | |
| 9 | Update all the mandatory fields. |
| 10 | Click Next button. |
| Result: The upgrade request will be routed to your company’s EVM for approval. Note: If your company does not have EVM, kindly refer to Supplier Registration > How do I become an EVM? |


Scenario 2: Upgrade from Web PO page.
| Step | Action |
| 1 | Go to Intel Web PO. |
| 2 | Click EVM conversion link.
|
| Result: The Upgrade to Standard (Full) Registration page will be displayed. | |
| 3 | Click Begin button. |
| 4 | Select the checkbox for Intel® Web Suite (Invoice/PO/Payment Tracker/ASN/Forecast) - Suppliers Only.
|
| 5 | Click Next button. |
| Result: The access request form will be displayed. | |
| 6 | Update all the mandatory fields. |
| Note: Mouse over the “?” icon for explanation of what to fill. | |
| 7 | Click Next button. |
| Result: The upgrade request will be routed to your company’s EVM for approval. Note: If your company does not have EVM, kindly refer to Supplier Registration > How do I become an EVM? |

| Step | Action |
| 1 | Go to Intel Web Invoice. |
| 2 | Click Create Credit Memo link. |
| Result: The Create New Credit Memo screen will be displayed. | |
| 3 | Enter PO number. For example, 4200103597.
|
| Note: You must enter the entire PO number in the PO field for Intel Web Invoice to retrieve the requested information and in order to continue. | |
| 4 | Click Create button. |
| Result: The credit memo for PO number entered will be created. | |
| Notes: The credit memo generated requires supplier to fill in additional mandatory fields. The supplier assumes responsibility to submit complete and accurate invoices. |
|
| 5 | Update the mandatory fields, Credit Type Supplier Original Invoice Number Credit Number Ship Service Date PO Line Credit Description |
| 6 | Click Review Credit Memo button. |
| Result: The Review Credit Memo screen will be displayed. | |
| Note: The errors and missing fields will be notified in red. | |
| 7 | Click Submit Credit Memo button.
OR, Click Edit Credit Memo button for amendment. |
| Result: The Credit Note screen will be displayed. | |
| Note: Supplier may print a copy of the generated invoice confirmation. |

FAQs
Frequently Asked Questions
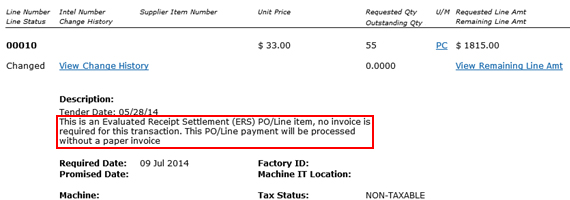
- All type of PO will need to submit invoice to Intel in order to get the payment except PO with ERS (Evaluated Receipt Settlement) line item.
- ERS, whereby invoices are automatically generated upon goods received; it is only applicable to certain
- countries/ goods purchase.
- Please check through the line item if it is ERS categorized
| Step | Action |
| 1 | Go to Intel Web Invoice. |
| 2 | Click Create New Invoice link. |
| Result: The Create New Invoice screen will be displayed. | |
| 3 | Enter PO number. For example, 4200103597.
|
| Note: You must enter the entire PO number in the PO field for Intel Web Invoice to retrieve the requested information and in order to continue. | |
| 4 | Click Create button. |
| Result: The invoice for PO number entered will be created. | |
Notes:
|
|
| 5 | Update the mandatory fields,
|
| 6 | Click Review Invoice button. |
| Result: The Review Invoice screen will be displayed. | |
| Note: The errors and missing fields will be notified in red. | |
| 7 | Click Submit Invoice button.
OR, Click Edit Invoice button for amendment. |
| Result: The TAX Invoice Confirmation screen will be displayed. | |
Notes:
|

- Following Intel invoice requirements will ensure that your invoice is paid within negotiated contract terms.
- The quickest way to invoice Intel is by using the Intel Web Invoice.
- If you wish to prepare invoices without using the Intel Web Invoice, please ensure your invoice has the required information for your region.
- You must enter the entire PO number for Intel Web Invoice to retrieve the requested information. Click Search for a PO, narrow the search criteria, and select the correct PO number.
- OR,
The PO you are seeking might have been converted from Intel’s prior system of record to the current one. Click Converted PO Numbers link to view and retrieve converted PO. - OR,
Contact your Intel Contact for more enquiries.
Step Action
1. Go to Intel Web Invoice.
2. Click Create New Invoice link. Result: The Create New Invoice screen will be displayed.
3. Enter PO number.
For example, 4200103597.

Note: You need to modify your profile setting in order to view more search results.
4. Click Add PO to Profile button.

Notes:
- If successful, the acknowledgement message will be displayed.

OR,
- Error message will be displayed.

Note:
- It takes 1 to 2 minutes to update your profile to the system.
- Error message will be generated in case the same Supplier Number/Vendor ID has already clicked on the same PO and still pending for approval.

5. Click Create button again to view the newly added PO result.

| Step | Action |
| 1 | Go to Intel Web PO. |
| 2 | Enter PO number. For example, 4200103597.
|
| 2 | Click Search button. |
| Result: The PO record will be generated. | |
| 4 | Click PO number.
|
Results:
|
|
Notes:
|

The Ship/Service date for service invoice is normally based on actual date the service was delivered/performed. A service invoice that was sent via the Web will go through an RFA (Request for Approval) process that requires the end-user at Intel to approve/reject the Intel Web Invoice.
Enter the total amount of Tax/VAT/GST applied to the invoice. If there is no Tax/VAT/GST for the invoice, you must enter an amount of "0." You need to enter a Total Tax for the invoice, even if the Total Tax is "0". The application will not calculate the amount of total tax on your invoice for you.
Scenario 1: Using Intel Web PO.
| Step | Action |
| 1 | Go to Intel Web Invoice. |
| 2 | Click Create New Invoice link. |
| Result: The Create New Invoice screen will be displayed. | |
| 3 | Enter PO number. For example, 4200103597.
|
| Note: You must enter the entire PO number in the PO field for Intel Web Invoice to retrieve the requested information and in order to continue. | |
| 4 | Click Create button. |
| Result: The invoice for PO number entered will be created. | |
Notes:
|
|
| 5 | Update the mandatory fields,
|
| 6 | Click Review Invoice button. |
| Result: The Review Invoice screen will be displayed. | |
| Notes: The errors and missing fields will be notified in red. | |
| 7 | Click Submit Invoice button.
OR, Click Edit Invoice button for amendment. |
| Result: The TAX Invoice Confirmation screen will be displayed. | |
Notes: The errors and missing fields will be notified in red.
|

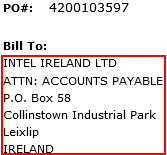
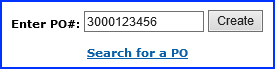
Scenario 2: Submit a paper invoice.
| Step | Action |
| 1 | Go to Intel Web Invoice. |
| 2 | Click Create New Invoice link. |
| Result: The Create New Invoice screen will be displayed. | |
| 3 | Enter PO Number. For example, 3000123456.
|
| Note: You must enter the entire PO number in the PO field for Intel Web Invoice to retrieve the requested information and in order to continue. | |
| 4 | Click Create button. |
| Result: An error message might be displayed on screen.
|
|
Notes:
|
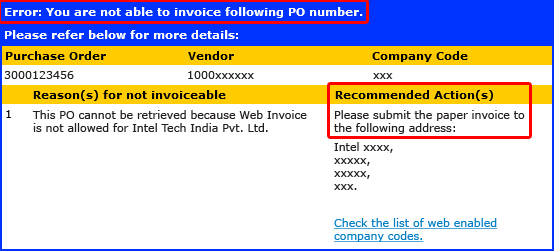
Please follow the steps below.
| Step | Action |
| 1 | Go to Intel Web Invoice. |
| 2 | Click Create New Invoice link. Result: The Create New Invoice screen will be displayed. |
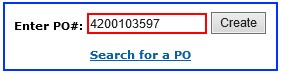
| 3 | Enter PO number. For example, 4200103597
Note: You must enter the entire PO number in the PO field for Intel Web Invoice to retrieve the requested information and in order to continue. |
| 4 | Click Create button. Results: The invoice for PO number entered will be created. Notes:
|
| 5 | Update the mandatory fields:
|
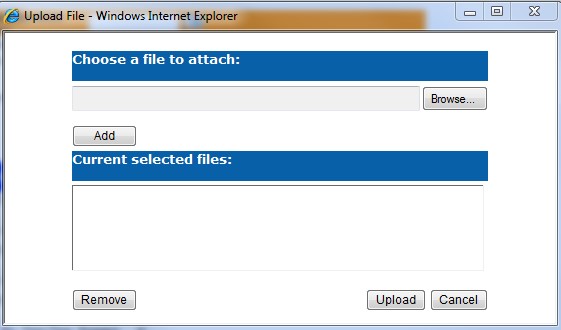
| 6 | To attach a document: Click  Result: The Upload File screen will be displayed.
Click Browse button and select the document that need to be uploaded. Note: Only .pdf .doc .docx .jpg .jpeg .xls .xlsx .csv file format allow. Max file size is 25 MB. |
| 7 | Click Add button. Then Click Upload button. |
| 8 | Select PO Line. |
| 9 | Click Review Invoice button. Result: The Review Invoice screen will be displayed. Note: The errors and missing fields will be notified in red. |
| 10 | Click Submit Invoice button. |
FAQs
Frequently Asked Questions
- The Down Payment Request functionality in Web Invoice has been disabled.
- Down Payment requests will be created by Intel procurement for suppliers from all countries except China, Vietnam, India and Israel.
- Down Payment request information will be displayed in line level texts in Web PO. Suppliers from China, Vietnam, India and Israel should contact their Intel procurement representative for the process to submit hard copy invoices.
- Intel requests that Intel Web Invoices be submitted on the expected arrival date of the shipment or after the goods have arrived at Intel's dock. Any shipment that is not received at the time of Intel Web Invoice submission will result in a mismatch. This will put the invoice on hold pending receipt of the shipment.
These invoices will show as a mismatch in the Buyer's queue and in the Intel Payment Tracker application. However, these will be updated when goods are received at Intel's dock.
Percentage payments can be submitted using Intel® Web Invoice.
You can invoice for partial shipment as long as the PO is not closed.
Intel starts the payment clock based on the date Intel receives a valid invoice or the date Intel receives the goods, whichever is later. This follows our purchase order and contract language.
You can suggest a shorter payment term (terms) during web invoice submission or through Intel Payment Tracker.
FAQs
Frequently Asked Questions
- The Intel Web Invoice application offers supplier a query to check the status of web invoices that have recently been submitted.
- The query can be found as a link within the application.
- Assists suppliers in tracking their submitted web invoices, and display work-in-process status.
- Provides visibility to web invoices that are yet to visible in Intel Payment Tracker tool.
- Intel Payment Tracker has TWENTY-FOUR (24) hours of SLA.
| Subject | Remark |
| Submitted | Invoice has been accepted without error and awaits further processing. |
| Transmitted | Invoice has been received and awaits further processing. |
| In-progress | Invoice is currently being evaluated by the system for entry into system of record, or has been blocked, and is awaiting mutual analysis. |
| Rejected | Invoices was rejected by system of record during invoice entry or manually by a processor following manual analysis. |
| Processed | Invoice has been assigned a status in the system of record. Status available on the Payment Tracker within TWENTY-FOUR (24) hours. |
| Step | Action |
| 1 | Go to Intel Web Invoice. |
| 2 | Click Create New Invoice link. |
| Result: The Create New Invoice screen will be displayed. | |
| 3 | Enter search criteria. For example, invoice number ABC123456.
|
| 4 | Click Find Web Invoices button.
|
| Result: The status of invoice ABC123456 will be display.
|
|
Notes:
|


All web invoice confirmations submitted in the Intel® Web Invoice application are stored directly in to an archive. Suppliers are requested to print or save a copy of each web confirmation for your reference prior to exiting the web invoice confirmation page as they do not have access to the web invoice archive.
To request for invoice copy, submit a request here with your correct PO number and invoice number.
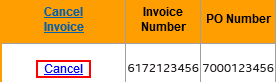
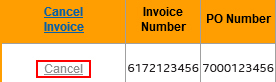
| Step | Action |
| 1 | Go to Intel Payment Tracker. |
| 2 | Enter search criteria. For example, invoice number 6172123456. |
| 3 | Click Generate Report button.
|
| Result: The matching record will be displayed. | |
| 4 | Click Cancel link.
|
| Result: The Invoice Cancellation Request page will be displayed as pop-up. | |
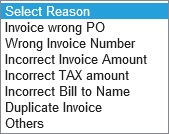
| 5 | Update reason for cancellation.
|
| Note: State the reason in Remark column, if Others is chosen. | |
| 6 | Click Submit button.
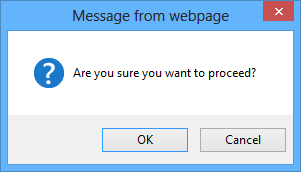
|
| Result: The confirmation message will be displayed.
|
|
| 7 | Click OK button. |
Results::
|
|
Notes::
|