Overview
OpenVINO™ Automatic Model Manifest Add-On is a tool for automated quantitative analysis and creation of a model card and performance profiling, given a set of OpenVINO™ models and a dataset. The tool is written in Python* with OpenVINO™ as backend and thus is portable to any system having support for these two.
OpenVINO™ Automatic Model Manifest Add-On can be executed using the Intel® Distribution of OpenVINO™ toolkit inference engine. If you have not installed the OpenVINO™ 2022.1 package, follow the Installation instructions.
Select Configure & Download to download the reference implementation and the software listed below.
- Time to Complete: 30 minutes
- Programming Language: Python* 3.10 or higher
- Available Software: Intel® Distribution of OpenVINO™ toolkit 2022.1
Target System Requirements
- Intel® Core™ i5 processor or above with 16 GB of RAM
- Ubuntu* 20.04 LTS, or Microsoft* Windows* 10
- Docker* version 20.10 or higher
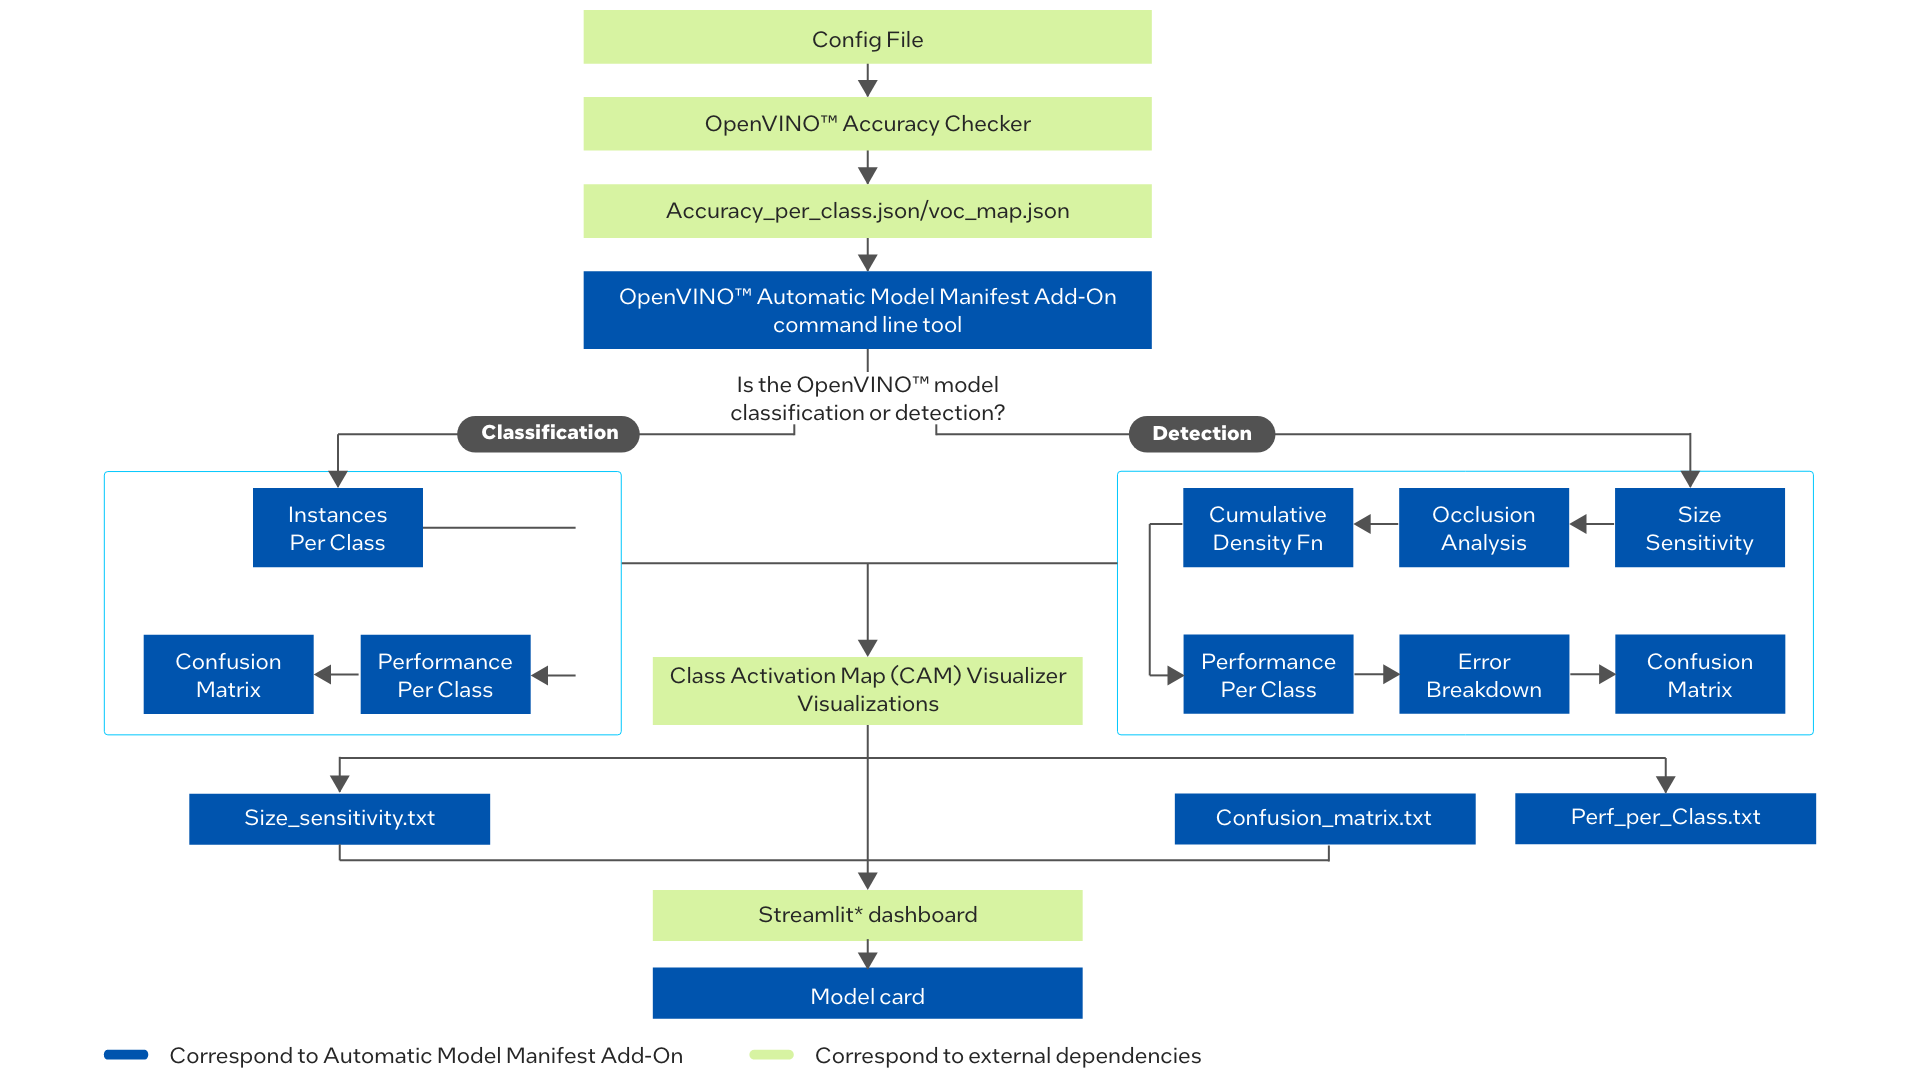
How It Works
The application uses the inference engine included in the Intel® Distribution of OpenVINO™ toolkit. The documentation demonstrates how the toolkit can be used for OpenVINO™ deep learning model performance profiling and model card creation. The Model Manifest Add-On is compatible with OpenVINO™ version 2022.1. Future releases of the solution are planned to support the latest OpenVINO™ version.
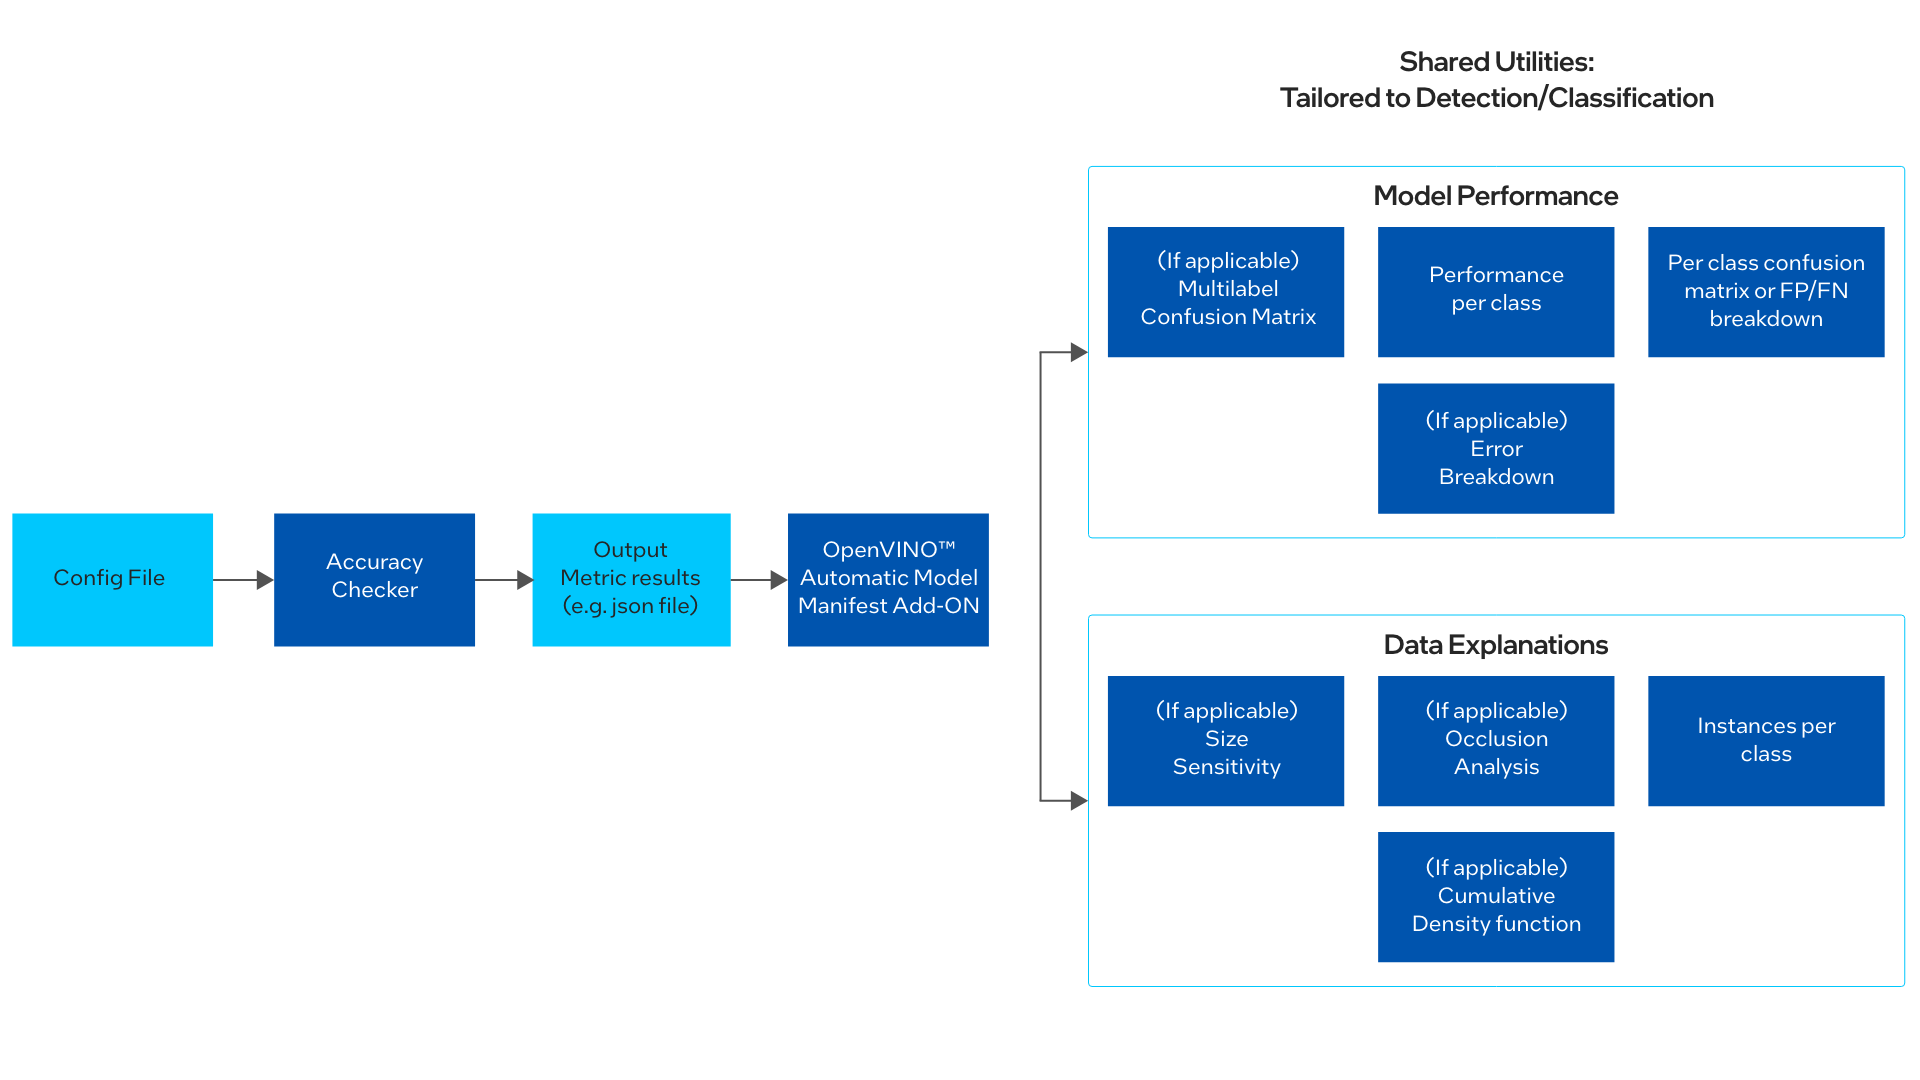
The figure below shows dependencies and a sample pipeline flow for detection and classification of OpenVINO™ models.
Get Started
Step 1: Install the Reference Implementation
Select Configure & Download to download the reference implementation and then follow the steps below to install it.
- Open a new terminal, go to the downloads folder and unzip the RI package.
unzip openvino_automatic_model_manifest_add_on.zip - Go to openvino_automatic_model_manifest_add_on/ directory.
cd openvino_automatic_model_manifest_add_on/ - Change permission of the executable edgesoftware file.
chmod 755 edgesoftware - Run the command below to install the Reference Implementation.
./edgesoftware install - During the installation, you will be prompted for the Product Key. The Product Key is contained in the email you received from Intel confirming your download.
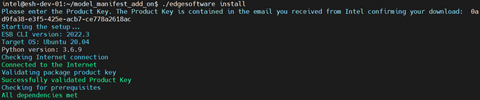
Figure 5: Product Key
- When the installation is complete, you will see the message “Installation of package complete” and the installation status for each module.

Figure 6: Install Success
Step 2 (Optional): Set Up Docker*
The package includes a Dockerfile that can be built and run if you choose to use a Docker setup.
Enter the commands:
docker build --tag amma:latest --file Dockerfile .
docker run -it --rm  -p 8501:8501 -v <user_path>:/app/amma --name amma amma:latest

python3 amma.py <user_commands>
python3 -m streamlit run amma_dashboard.py
WARNING: Exercise caution: Potential for .dll injection
Docker uses Windows Subsystem for Linux* to run the Docker environment on Windows or Linux, and thus it could be subjected to .ddl injection. The DLL load for WSL includes NAME NOT FOUND for one of the loads, which could result in .dll injection. Please exercise caution if this is a risk for your use case.
Run the Application
Follow the steps below:
- Install the dependencies in requirements.txt using pip.
- Create a .yml file with the path your model and dataset directories accordingly as input to OpenVINO™ Accuracy Checker.
You can find documentation on how to construct a .yml file for OpenVINO™ Accuracy Checker here.
You can find Accuracy Checker .yml configuration files for pre-trained models in the OpenVINO™ Model Zoo directly within the zoo here. - To run OpenVINO™ Automatic Model Manifest Add-On, use the following command:
python3 amma.py -c [path_to_configuration_yml_file]Where:
-c is a required argument. Configuration file for OpenVINO™ Accuracy Checker.
--class_labels is an optional argument. OpenVINO™ Automatic Model Manifest Add-On will filter the class labels using this argument to generate the summary report.
OpenVINO™ Automatic Model Manifest Add-On will generate and save the following documents:
- If applicable, Performance per class results in perf_per_class.txt
- Performance output and model info in a json file and images in result directory.
- The model card can then be viewed using a Streamlit* dashboard. Please see the following section for additional information.
NOTE: Do not interrupt the tool during the run, or the following potential scenarios may occur: the created folders may be empty, a folder with a partial list of files, or corrupted files. The solution attempts to delete a corrupted folder if a keyboard interruption is detected.
You can find Accuracy Checker .yml config files for models in the OpenVINO™ Model Zoo in the model zoo GitHub repository.
Examples
The commands below can be used to run OpenVINO™ Automatic Model Manifest Add-On for specific use cases.
- Detection with class_labels and ssd300 model:
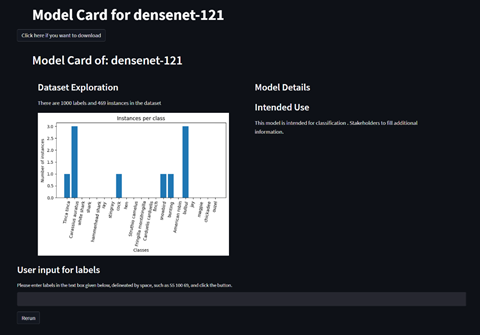
python3 amma.py -c ac_configs%2fmobilenet-ssd_config-vector.yml --class_labels 1 2 20 - Classification without class_labels and densenet-121 model:
python3 amma.py -c ac_configs%2fdensenet-accuracy-check.yml -
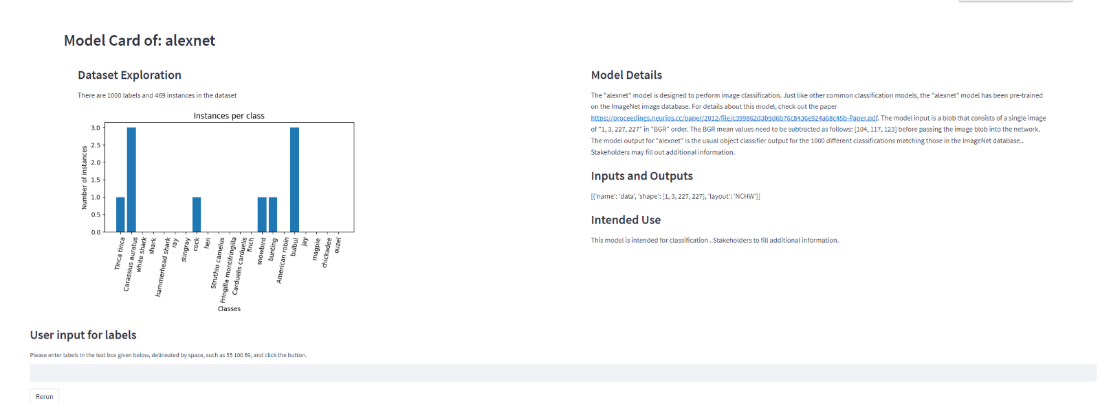
Classification with class_labels and alexnet model:
python3 amma.py -c ac_configs%2falexnet-accuracy-check.yml --class_labels 1 2 380
Run the Dashboard: Validation and Generation
Read before proceeding: The OpenVINO™ Automatic Model Manifest Add-On solution should always be used with a TLS capable load balancer. By default, Streamlit* generates a dashboard with the HTTP Protocol. You can implement a load balancer/reverse proxy setup, such as with Nginx, for your production environment, to force the dashboard from HTTP to the HTTPS protocol. See the Appendix for a sample nginx.conf file.
Run the following command to generate the Streamlit dashboard:
streamlit run amma_dashboard.py
NOTE: The dashboard will automatically pull from the last modified model/timestamp directory. If you would like to generate the results for a different directory, you may also enter the filepath through the Streamlit dashboard.
Change Model Details
This section describes how to manually modify or add text to the Model Details section of the generated report.
For OpenVINO™ models:
- dump_info.json will be present within result/<model_name>/<timestamp> directory, so running the script below will replace an existing json file.
For custom models:
- dump_info.json will not be present within result/<model_name>/<timestamp> directory.
Follow these steps:
- Open json_create.py within utils folder and follow the instructions mentioned to fill the required details (mainly description, input_info, layers and be sure to use the correct model name and timestamp within file path). See a reference example in the commented section of the file.
- Run python3 utils/json_create.py which creates dump_info.json within the result/<model_name>/<timestamp> directory.
- Run streamlit run amma_dashboard.py to see the required changes within the model details section.
Build a Solution Based on the Product
Developers can leverage OpenVINO™ Automatic Model Manifest Add-On for classification and detection workloads to generate performance profiling reports. Future releases of the solution are planned to include support for automatic metric generation and TensorFlow* models.
Alternatively, the OpenVINO™ Automatic Model Manifest Add-On API can be integrated in the source code of a product for use cases.
Summary and Next Steps
You successfully ran the OpenVINO™ Automatic Model Manifest Add-On application and displayed the result using the Intel® Distribution of OpenVINO™ toolkit Inference Engine.
As a next step, you can integrate OpenVINO™ Automatic Model Manifest Add-On into your application via the API.
Learn More
To continue learning, see the following guides and software resources:
Troubleshooting
How do I get OpenVINO™ Model Files?
Run the commands:
# Create MODEL_DIR
cd MODEL_DIR
omz_downloader --name <model_name>
omz_converter --name <model_name>
This creates xml and bin file in MODEL_DIR/public/<model_name>/ directory.
Command to search for all pretrained models in OpenVINO™ zoo:
omz_downloader –print_all
How do I download datasets?
For the Pascal VOC 2007 dataset:
- The tar can be downloaded from: http://host.robots.ox.ac.uk/pascal/VOC/voc2007/VOCtrainval_06-Nov-2007.tar by opening link in separate tab or by using wget command in Linux.
- Extract the tar file and then place the VOCdevkit folder (this contains VOC2007 folder which contains Annotations, ImageSets, JPEGImages, SegmentationClass and SegmentationObject) in DATASET_DIR.
For the Imagenet dataset:
- The Imagenet dataset can be downloaded from: https://www.image-net.org/download.php
What changes are required in .yml file for new model?
You may need to modify the .xml file (e.g., put.xml file location in the model field under launchers) and dataset paths for your custom model/dataset.
You can find additional documentation how to modify the Accuracy checker config .yml file for your use case in the Accuracy Checker documentation: https://docs.openvino.ai/latest/omz_tools_accuracy_checker.html
You can find Accuracy Checker .yml config files for models in the OpenVINO Model Zoo in the model zoo GitHub repository.
Issues when sourcing setupvars.sh
Be sure to use Python version 3.6, 3.7, 3.8, or 3.9. Do not upgrade to a Python version above 3.9.
OpenVINO™ not found Error
We recommend that you install using pip in virtual environment and follow the steps mentioned here: Install Intel® Distribution of OpenVINO™ Toolkit from PyPI Repository
Support Forum
If you're unable to resolve your issues, contact the Support Forum.
Appendix
This section contains a sample NGINX Conf file below to force the HTTP connection to HTTPS.
Replace mydomain.test with your domain name. Typing your domain name in your browser will cause the HTTPS redirect to take place.
#Redirects mydomain.test to dev server
server {
    listen       80;
    server_name  www.mydomain.test mydomain.test;
    location / {
        proxy_pass http://127.0.0.1:8000;  # reverse proxy to your dev server
        proxy_set_header Host $host;
        proxy_http_version 1.1;
    proxy_set_header X-Forwarded-For $proxy_add_x_forwarded_for;
    proxy_set_header Host $host;
    proxy_set_header Upgrade $http_upgrade;
    proxy_set_header Connection "upgrade";
    proxy_read_timeout 86400;
    }
    return 301 https://mydomain.test$request_uri;
}
#Redirects mydomain.test to https://mydomain.test
server {
    listen       443 ssl;
    server_name  www.mydomain.test mydomain.test;
    ssl_protocols TLSv1.2 TLSv1.3;
    ssl_certificate "/home/rcheruvu_nuc/minica/mydomain.test/cert.pem";
    ssl_certificate_key "/home/rcheruvu_nuc/minica/mydomain.test/key.pem";
    ssl_session_cache shared:SSL:1m;
    ssl_session_timeout  10m;
    ssl_prefer_server_ciphers on;
    ssl_ciphers HIGH:!aNULL:!MD5;
    location / {
        proxy_pass http://127.0.0.1:8000;
        proxy_set_header Host $host;
        proxy_http_version 1.1;
    proxy_set_header X-Forwarded-For $proxy_add_x_forwarded_for;
    proxy_set_header Host $host;
    proxy_set_header Upgrade $http_upgrade;
    proxy_set_header Connection "upgrade";
    proxy_read_timeout 86400;
    }
}