Overview
Reference architecture that integrates video decode and analytic capabilities in a single box powered by Intel® Core-based processor. Configure your application end-to-end with flexible AI capacity and reference video analytics pipeline for fast development.
The Intel® Edge AI Box can be a stand-alone device connected to video sources such as IP cameras or network video recorders (NVRs) to enable edge video analytics in real time, or it can be connected to the network and serve as a discrete AI service on the network to run offline deep learning analytics on-demand.
Select Configure & Download to download the package and the software listed below.
Prerequisites
- Programming Language: Python, C, C++
- Available Software:
- Intel® Distribution of OpenVINO™ toolkit 2023.1, 2023.0 (only available in dlstreamer container)
- Intel® Deep Learning Streamer 2023.0
- Intel® oneAPI Video Processing Library
- Intel® oneAPI Deep Neural Networks Library
- OpenCV 4.8.0 (limited features)
- Intel® FFmpeg Cartwheel 2023Q2 (limited features)
- XPU-Manager, Node-Exporter, Prometheus, and Grafana for CPU and GPU telemetry
Recommended Hardware
The following hardware is recommended for use with this package. See the Recommended Hardware page for other suggestions.
|
Intel® NUC11 Performance series (for example, NUC11PAHi7) |
|
|
Intel® NUC12 Pro series (for example, NUC12WSHv7) |
|
|
Intel® NUC12 Compute Element series (for example, ELM12HBv7) |
|
|
IEI TANK-XM811 AIoT Developer Kit with 12th Gen Core Processor |
|
|
IEI TANK-XM811AI-RPL AIoT Developer Kit with 13th Gen Core Processor |
|
Target System Requirements
- 11th, 12th, or 13th Generation Embedded Intel® Core™ processors
- 12th generation Intel® Core™ Desktop processors with Intel® Arc™ A380 Graphics
- Intel Atom® Processor X7000 Series (formerly Alder Lake-N)
- Intel® Processor N-series (formerly Alder Lake-N)
- Operating System:
- Ubuntu* Desktop 22.04 (fresh installation)
- At least 80 GB of disk space
- At least 8 GB of memory
- Direct Internet access
Ensure you have sudo access to the system and a stable Internet connection.
How It Works
Intel® Edge AI Box reference architecture forms the base to create a complete video analytic system for lightweight edge devices. This package supports the 11th, 12th, and 13th generation embedded Intel® Core™ processors, 12th generation desktop Intel® Core™ processors with Intel® Arc™ A380 Graphics, Intel Atom® processor X7000 series. and Intel Atom® process N-series (formerly Alder Lake-N).

The core of Intel® Edge AI Box reference architecture is a suite of containers. The Video Analytics (VA) Base Library container includes OpenVINO™, oneDNN, and GPU drivers for accelerated inferencing and media processing. Two other containers, Base-devel and OpenCV FFmpeg, extend the VA Base Library container:
|
Container |
Content |
|
Base |
VA Base Library (contains OpenVINO 2023.1 runtime) |
|
Base-devel |
VA Base Library and OpenVINO 2023.1 developer tools |
| OpenCV FFmpeg | VA Base Library, OpenCV, and FFmpeg |
|
DLStreamer |
Ubuntu 22.04, DLStreamer/GStreamer, OpenVINO 2023.0 runtime, and developer tools |
Packages
The Intel® Edge AI Box package can be configured for different environments:
|
Environment |
Intended Usage |
|
Platform Qualification |
Measure platform performance, run Intel® Edge Device Qualification for Edge AI Box. |
|
Reference Implementation |
Run demos |
|
Solution Development |
Develop applications and solutions |
Platform Qualification Environment
The device qualification tool suite available in the Platform Qualification environment includes benchmarks to measure platform performance. It includes OpenVINO™ based neural network model benchmarks, Video analytics pipeline benchmarks, Memory benchmarks, GPU performance measurement, and Video decode performance benchmarks.
Reference Implementation Environment
In this version of Intel® Edge AI Box, the Reference Implementation environment includes a multi-channel inference pipeline for the YOLOv3 Object Detection network. The reference implementation supports up to 16 cameras as input and for visualizing detected objects from all channels on a single screen.
Solution Development Environment
The solution development environment includes the four containers mentioned above and can be a starting point for your video analytic application.
Get Started
Prerequisite
- Perform a fresh installation of Ubuntu Desktop 22.04 on the target system.
- Run the following commands after fresh installation of Ubuntu 22.04
sudo apt update
sudo apt upgrade –y
sudo apt-get install locales –y
sudo locale-gen en_US.UTF-8
sudo update-locale LANG=en_US.UTF-8 LC_CTYPE=en_US.UTF-8
LC_IDENTIFICATION=en_US.UTF-8
sudo reboot
Install the Package
-
Select Configure & Download to download the Intel® Edge AI Box package.
Configure & Download - Choose the required environment and configuration based on your needs. (This example uses the Platform Qualification environment.)
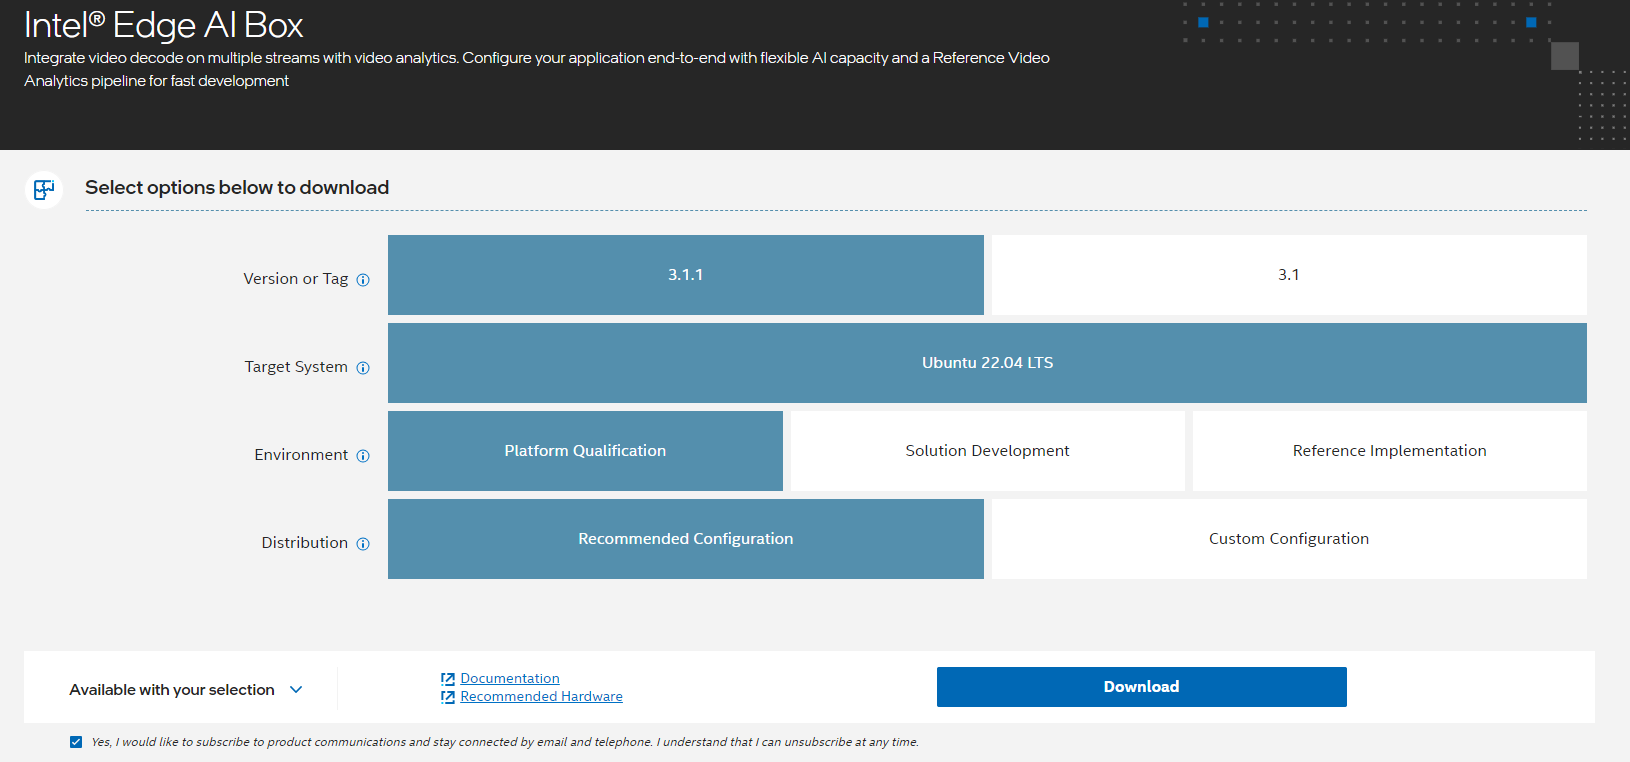
- Click Download. In the next screen, accept the license agreement and copy the Product Key.
- Transfer the downloaded package to the target Ubuntu* system and unzip:
unzip intel_edge_aibox.zip
NOTE: Please use the same credential that was created during Ubuntu installation to proceed with the installation for Intel® Edge AIBox
- Go to the intel_edge_ai_box/ directory:
cd intel_edge_aibox
- Change the permission of the executable edgesoftware file:
chmod 755 edgesoftware
- Install the Intel® Edge AI Box package:
./edgesoftware install
- When prompted, enter the Product Key. You can enter the Product Key mentioned in the email from Intel confirming your download (or the Product Key you copied in step 3).
Note for People’s Republic of China (PRC) Network:
- If you are connecting from the PRC network, the following prompt will appear during bmra base installation:

- Type Yes, and the installation script will replace certain download sources. This is to avoid download failure in the PRC network. Then, while installing the AI Box Test Module, the following prompt will appear:

- Type Yes to replace certain GitHub* links.
- When prompted for the BECOME password, enter your Linux* account password.

- When prompted to reboot the machine, press Enter. Ensure to save your work before rebooting.

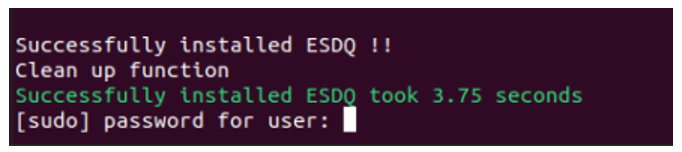
- After rebooting, resume the installation:
cd intel_edge_aibox ./edgesoftware install - After the ESDQ is installed, you will be prompted for the password. Enter the password to proceed.
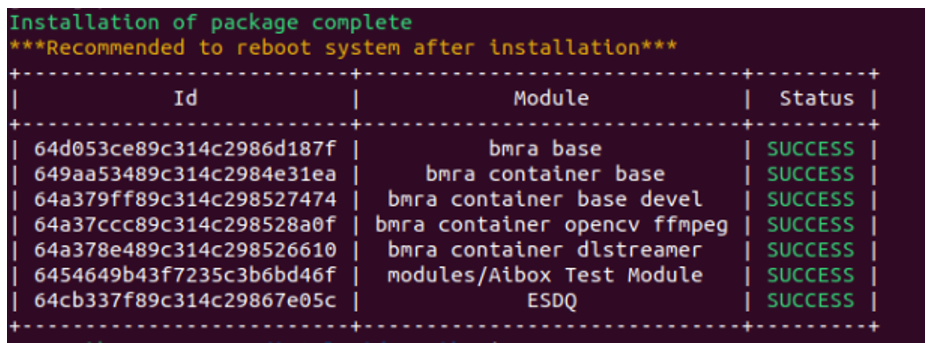
- When the installation is complete, you will see the message “Installation of package complete” and the installation status for each module.
- Reboot the system:
sudo reboot
Run Benchmarks with Device Qualification Tools
Prerequisite: Please make sure that the installed Intel® Edge AI Box package was configured for the "Platform Qualification" environment to run the benchmarks
The Intel® Edge Software Device Qualification (Intel® ESDQ) infrastructure is used to run the test suites. All Intel® Edge AI Box tests are invoked as arguments to the Intel® ESDQ infrastructure. For the complete Intel® ESDQ CLI, refer to Intel® ESDQ CLI Overview.
Find the available Intel® Edge AI Box tests:
cd intel_edge_aibox/Intel_Edge_AI_Box_3.1.1
esdq --verbose module run aibox --arg "-h"
Execute all device qualification tests and generate the complete report:
cd intel_edge_aibox/Intel_Edge_AI_Box_3.1.1
esdq --verbose module run aibox --arg "-r all"
For more details on running the device qualification tools, refer to Intel® Edge Software Device Qualification for Intel® Edge AI Box.
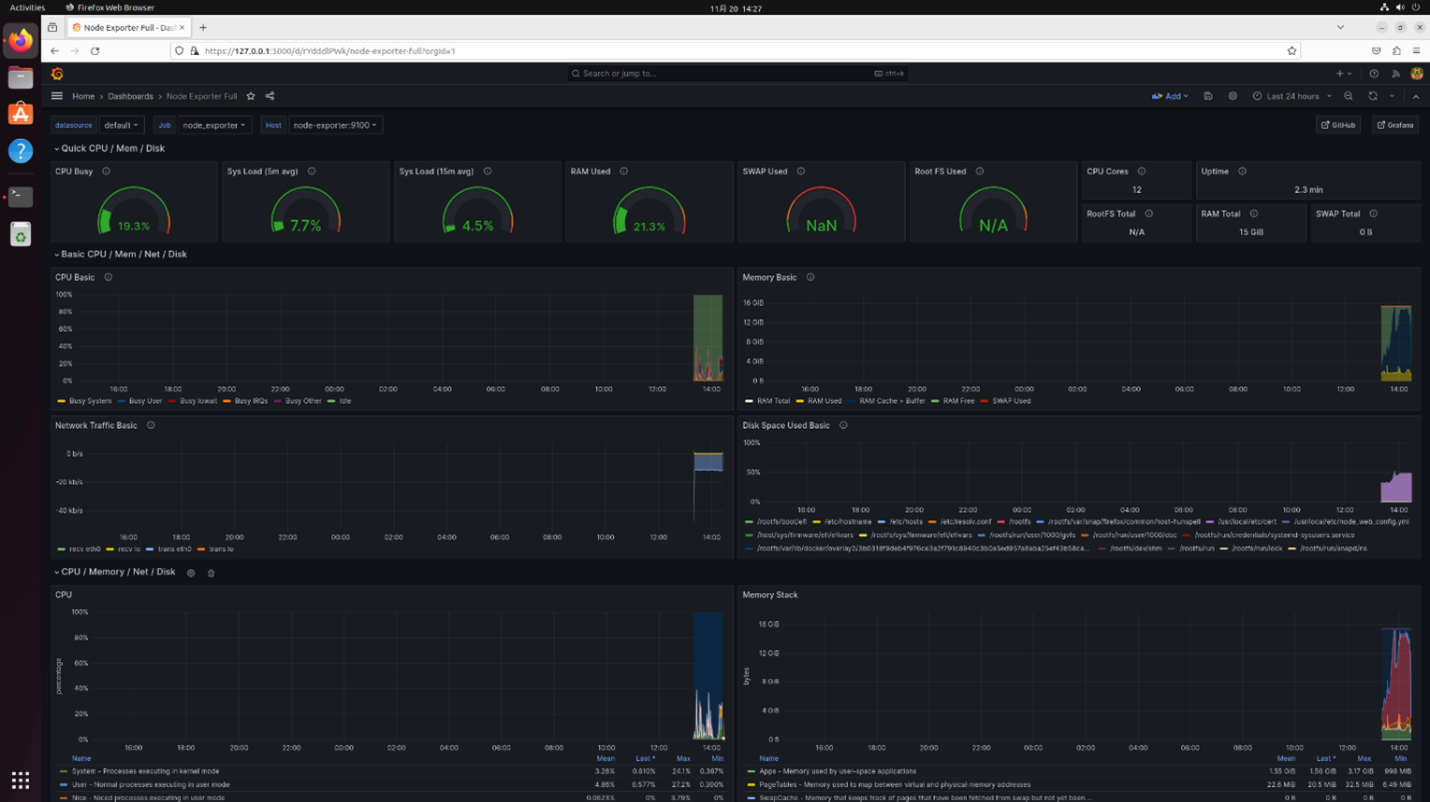
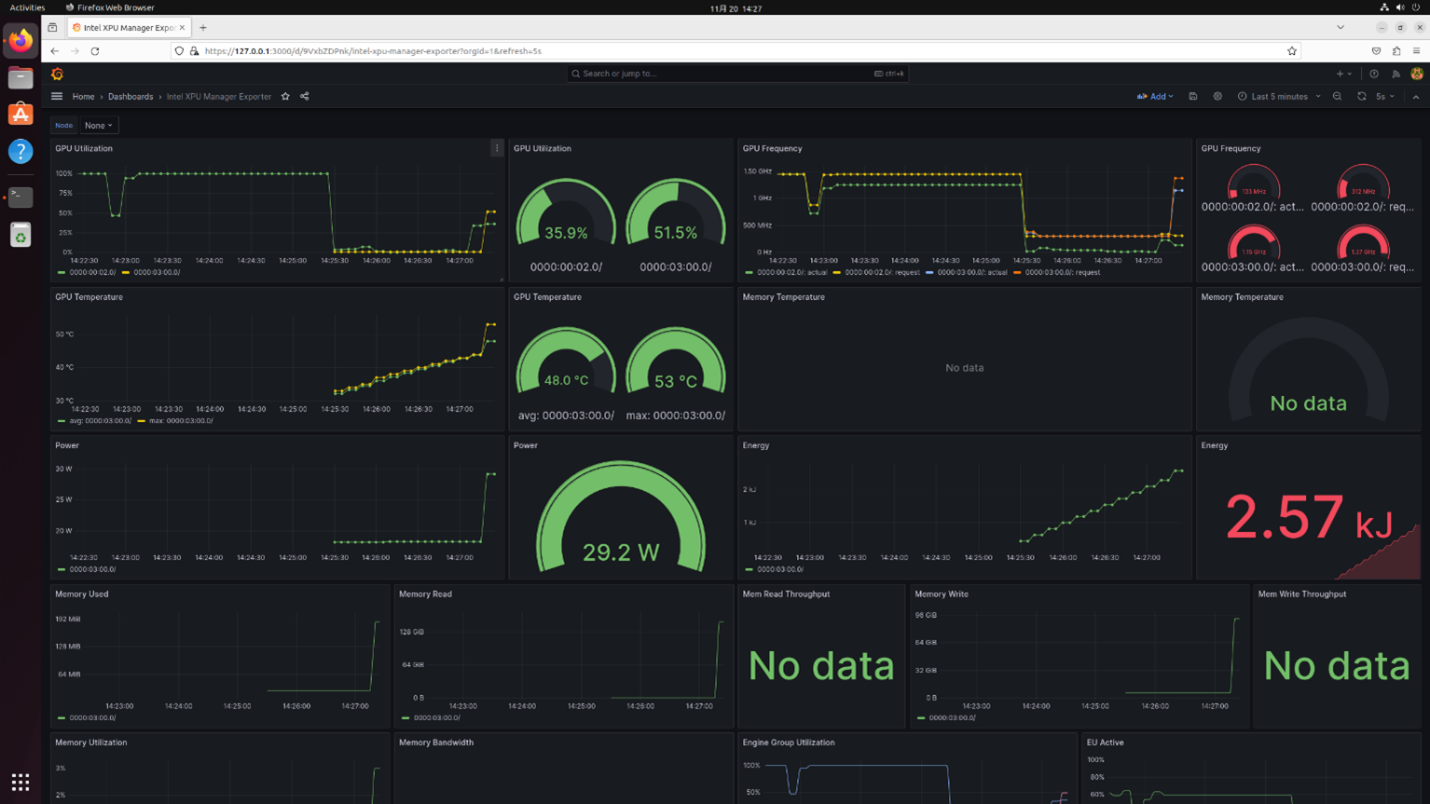
Telemetry of CPU and GPU Utilization
After installing the Intel® Edge AI Box, telemetry will automatically start during system power-up. You can visualize the CPU and GPU utilization through a dashboard.
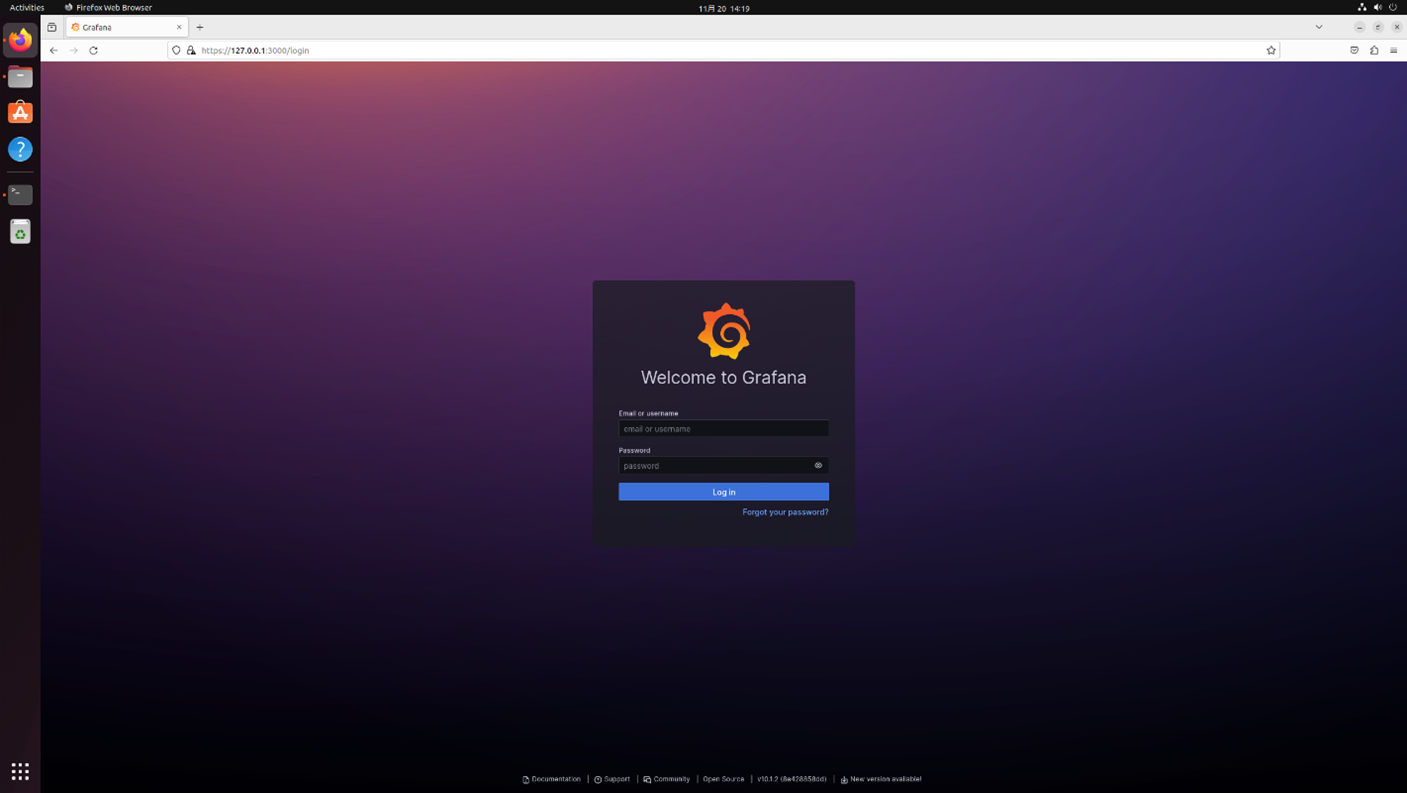
- From your web browser, go to https://127.0.0.1:3000. Log in with the default credentials:
- Username: admin
- Password: admin
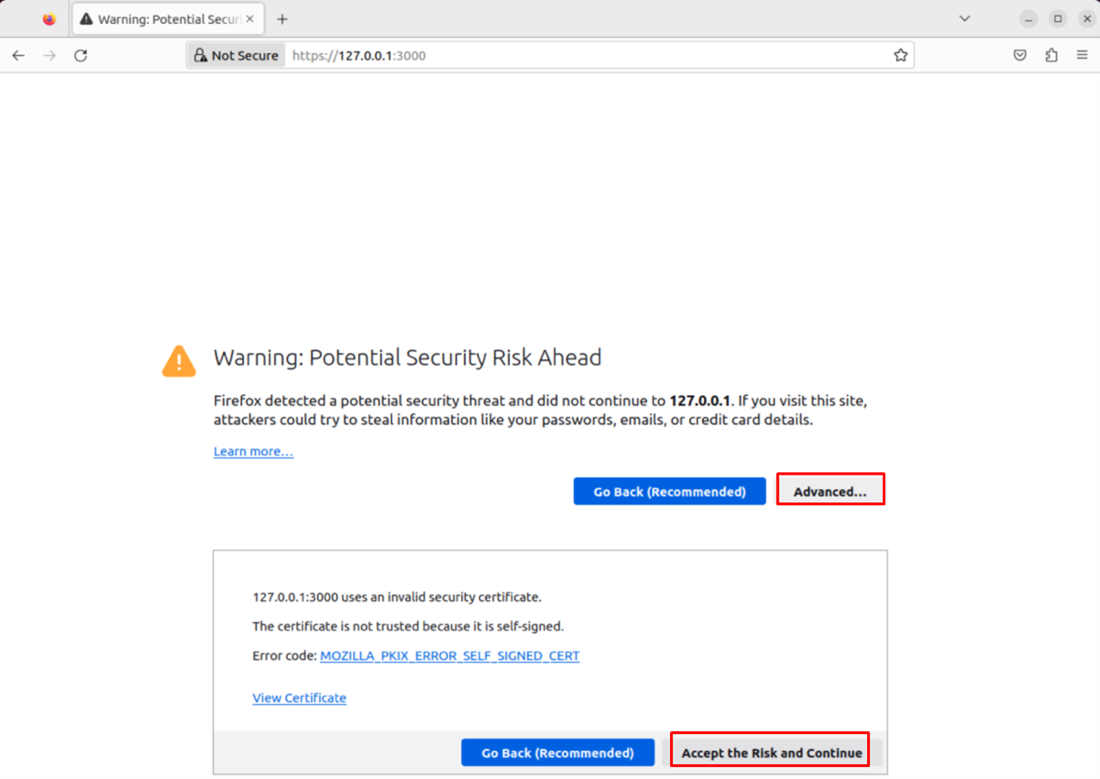
NOTE: If you see the Potential Security Risk Ahead warning, click Advanced and then Accept the Risk and Continue.
- After logging in for the first time, when prompted, change your password.
- If you are connected to the device remotely, use the following command to forward port 3000:
ssh -L 3000:127.0.0.1:3000 user@aibox_device_ip - Then, log in to https://127.0.0.1:3000 from your local browser.
- After logging in, click the top left menu. Navigate to Home > Dashboards > General to see the available dashboards.
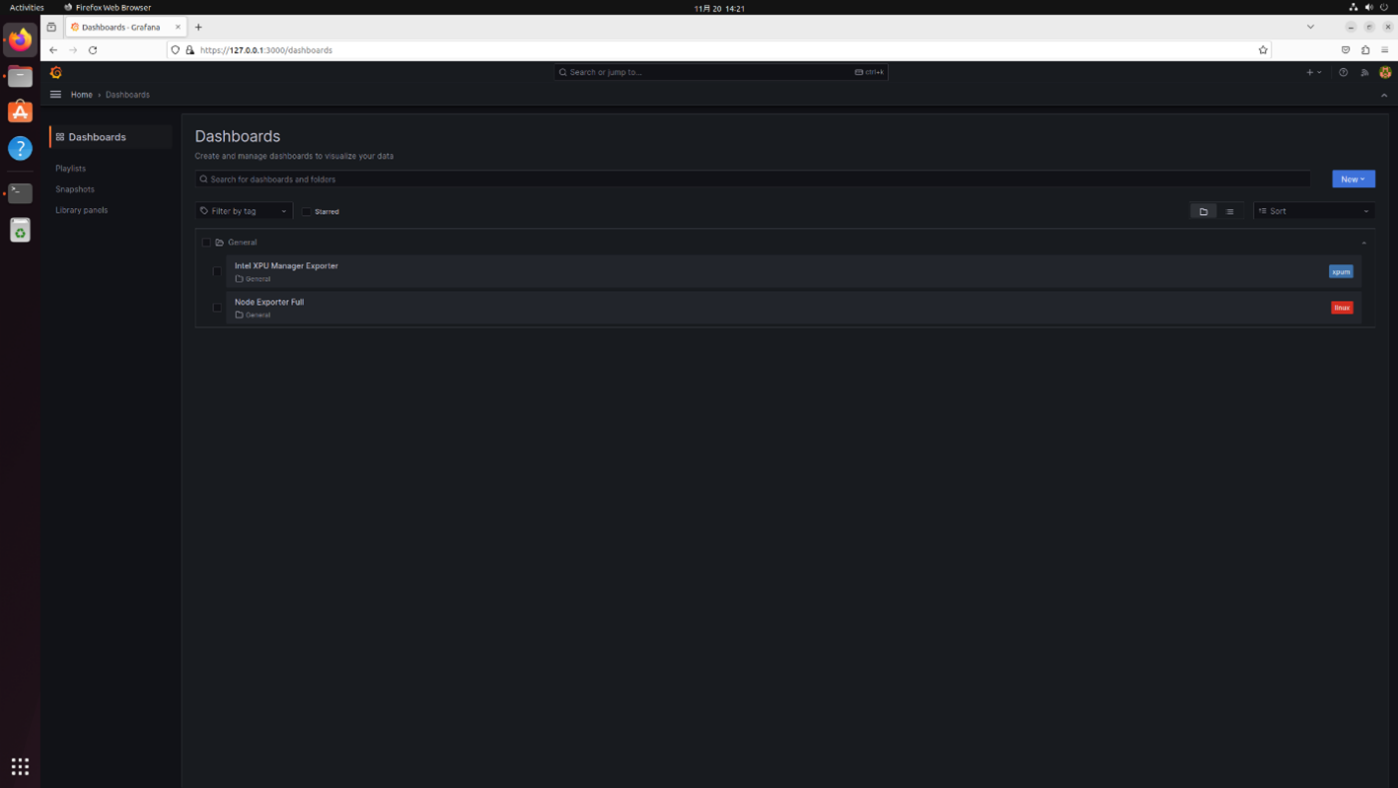
- Select Node Exporter Full to view the CPU and OS telemetries.
-
Select Intel XPU Manager Exporter from the dashboard to view the GPU telemetrics.
-
To stop the telemetry, run the following command:
aibox_monitor.sh stop -
You can also start the telemetry manually:
aibox_monitor.sh startNOTE: The aibox_monitor.sh script is in $HOME/.local/bin/. You will be able to run the script without specifying the complete path.
Run Reference Application
Prerequisite: Please make sure that the installed Intel® Edge AI Box package was configured for the "Reference Implementation" environment to run the reference application
NOTE: If you run reference applications over SSH sessions, set DISPLAY environment as following: export DISPLAY=:0
Multi-channel Object Detection
This reference application is the containerized version of the demo of the same name available in the OpenVINO Model Zoo. The container is called multi_channel_object_detection:3.1.1.
The following command runs the application using the default bottle-detection.mp4 video, duplicated four times:
export DEVICE=/dev/dri/renderD128
export DEVICE_GRP=$(ls -g $DEVICE | awk '{print $3}' | \
xargs getent group | awk -F: '{print $3}')

docker run -it \
--device /dev/dri --group-add=$DEVICE_GRP  \
-v /tmp/.X11-unix:/tmp/.X11-unix \
-v /run/user/1000/wayland-0:/tmp/wayland-0 \
multi_channel_object_detection:3.1.1 \
-i /home/aibox/bottle-detection.mp4 \
-m /home/aibox/share/models/public/yolo-v3-tf/FP16/yolo-v3-tf.xml \
-duplicate_num 4 -d GPU
To run in dGPU, change to GPU.1.
Things to Try
Replace -i /home/aibox/bottle-detection.mp4 with -i rtsp://camera_url to connect to an IP camera.
Specify multiple camera sources by -i rtsp://camera1_url,rtsp://camera2_url,....
Use VBA Base Library Containers
The core of Intel® Edge AI Box reference architecture is a suite of containers. The VA Base Library container includes OpenVINO™, oneDNN, and GPU drivers for accelerated inferencing and media processing.
These containers are available on the platform for your projects, and the corresponding Dockfiles are in /opt/intel/base_container/dockerfile.
| REPOSITORY | TAG | IMAGE ID | CREATED | SIZE |
|---|---|---|---|---|
| aibox-opencv-ffmpeg | 3.1.1 | 236118f0ca6d | 4 days ago | 4.4 GB |
| aibox-dlstreamer | 3.1.1 | a397a9786ee9 | 4 days ago | 15.5 GB |
| aibox-base-devel | 3.1.1 | f6b0ee7ecddd | 4 days ago | 12 GB |
| aibox-base | 3.1.1 | 724fd64df066 | 4 days ago | 1.48 GB |
Sample Usage 1 - Multi-Channel Object Detection Using YOLOv3
The following docker file is used to build the multi-channel object detection in the Reference Implementation package. The file uses aibox-base-devel:3.1.1 to download models from the OpenVINO model zoo and aibox-opencv-ffmpeg:3.1.1 to compile the demo.
For more details, install the Intel® Edge AI Box package configured for the Reference Implementation environment and go through the intel_edge_aibox/Intel_Edge_AI_Box_3.1.1/Intel_Edge_AIBox_Samples/multi_channel_object_detection_yolov3 directory.
#============================================================================
# Copyright (C) 2022 Intel Corporation
#
# SPDX-License-Identifier: MIT
#============================================================================

FROM aibox-base-devel:3.1.1 as builder
ARG https_proxy
ARG http_proxy
ARG no_proxy

RUN mkdir -p $HOME/share/models/
RUN omz_downloader -o $HOME/share/models --name yolo-v3-tf
RUN omz_converter -o $HOME/share/models -d $HOME/share/models --name yolo-v3-tf


FROM aibox-opencv-ffmpeg:3.1.1
ARG https_proxy
ARG http_proxy
ARG no_proxy

USER root
RUN apt update -y && apt -y install git

USER aibox
ENV HOME=/home/aibox
WORKDIR /home/aibox

RUN git clone --branch releases/2023/1 --depth 1 --recurse-submodules https://github.com/openvinotoolkit/open_model_zoo.git /home/aibox/open_model_zoo
COPY --chown=aibox:aibox build_omz_demos.sh .
RUN chmod 755 /home/aibox/build_omz_demos.sh
RUN bash build_omz_demos.sh

COPY --from=builder /home/aibox/share /home/aibox/share

RUN curl -L -o bottle-detection.mp4 https://github.com/intel-iot-devkit/sample-videos/raw/master/bottle-detection.mp4

WORKDIR /home/aibox/omz_demos_build/intel64/Release
ENV XDG_RUNTIME_DIR=/tmp
ENV WAYLAND_DISPLAY=wayland-0

ENTRYPOINT ["/home/aibox/omz_demos_build/intel64/Release/multi_channel_object_detection_demo_yolov3"]
CMD ["-h"]
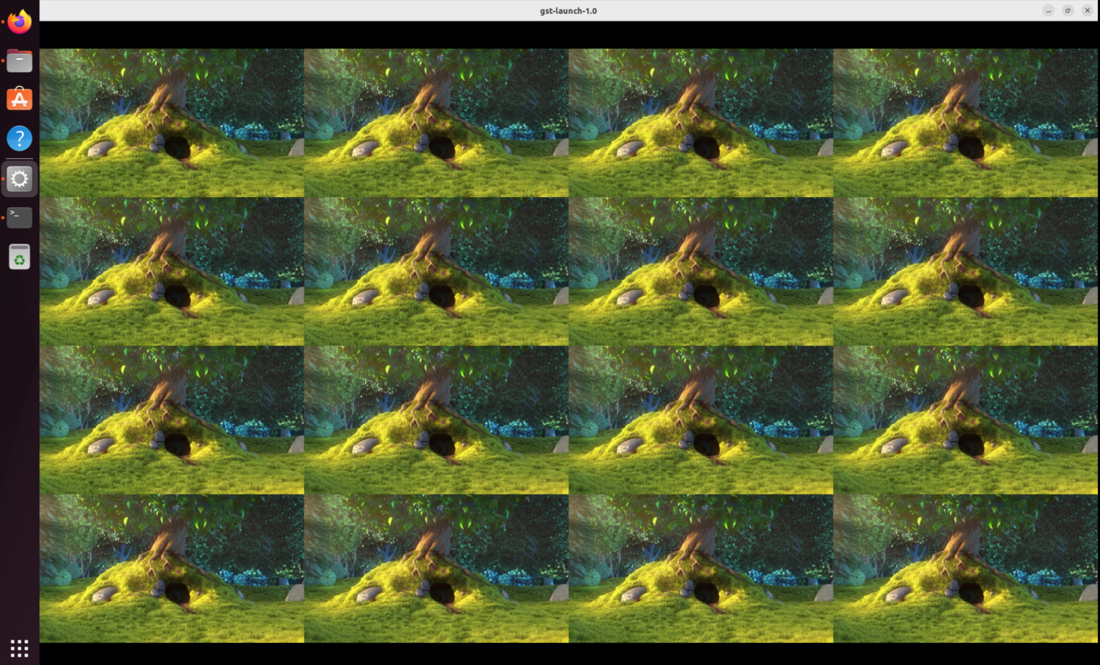
Sample Usage 2 – Video Decode and Tiled Display
The following sample shows the use of the aibox-dlstreamer: 3.1.1 container for streaming and media processing. This sample decodes 16 video files using VAAPI and composes them for display on a 2K resolution (2560x1440) monitor.
- You can use your video or download a sample video from https://vimeo.com/644498079. The following sample uses Big_Buck_Bunny.mp4 from the /videos directory.
- In your home directory, create a file decode.sh and add the following code:
#!/bin/bash
source /opt/intel/dlstreamer/setupvars.sh
VIDEO_IN=videos/Big_Buck_Bunny.mp4
gst-launch-1.0 vaapioverlay name=comp0 sink_0::xpos=0 sink_0::ypos=0 sink_0::alpha=1 sink_1::xpos=640 sink_1::ypos=0 sink_1::alpha=1 sink_2::xpos=1280 sink_2::ypos=0 sink_2::alpha=1 sink_3::xpos=1920 sink_3::ypos=0 sink_3::alpha=1 sink_4::xpos=0 sink_4::ypos=360 sink_4::alpha=1 sink_5::xpos=640 sink_5::ypos=360 sink_5::alpha=1 sink_6::xpos=1280 sink_6::ypos=360 sink_6::alpha=1 sink_7::xpos=1920 sink_7::ypos=360 sink_7::alpha=1 sink_8::xpos=0 sink_8::ypos=720 sink_8::alpha=1 sink_9::xpos=640 sink_9::ypos=720 sink_9::alpha=1 sink_10::xpos=1280 sink_10::ypos=720 sink_10::alpha=1 sink_11::xpos=1920 sink_11::ypos=720 sink_11::alpha=1 sink_12::xpos=0 sink_12::ypos=1080 sink_12::alpha=1 sink_13::xpos=640 sink_13::ypos=1080 sink_13::alpha=1 sink_14::xpos=1280 sink_14::ypos=1080 sink_14::alpha=1 sink_15::xpos=1920 sink_15::ypos=1080 sink_15::alpha=1 ! vaapipostproc ! xvimagesink sync=false \
\
filesrc location=${VIDEO_IN} ! qtdemux ! vaapih264dec ! gvafpscounter ! vaapipostproc scale-method=fast ! video/x-raw,width=640,height=360 ! comp0.sink_0 \
filesrc location=${VIDEO_IN} ! qtdemux ! vaapih264dec ! gvafpscounter ! vaapipostproc scale-method=fast ! video/x-raw,width=640,height=360 ! comp0.sink_1 \
filesrc location=${VIDEO_IN} ! qtdemux ! vaapih264dec ! gvafpscounter ! vaapipostproc scale-method=fast ! video/x-raw,width=640,height=360 ! comp0.sink_2 \
filesrc location=${VIDEO_IN} ! qtdemux ! vaapih264dec ! gvafpscounter ! vaapipostproc scale-method=fast ! video/x-raw,width=640,height=360 ! comp0.sink_3 \
\
filesrc location=${VIDEO_IN} ! qtdemux ! vaapih264dec ! gvafpscounter ! vaapipostproc scale-method=fast ! video/x-raw,width=640,height=360 ! comp0.sink_4 \
filesrc location=${VIDEO_IN} ! qtdemux ! vaapih264dec ! gvafpscounter ! vaapipostproc scale-method=fast ! video/x-raw,width=640,height=360 ! comp0.sink_5 \
filesrc location=${VIDEO_IN} ! qtdemux ! vaapih264dec ! gvafpscounter ! vaapipostproc scale-method=fast ! video/x-raw,width=640,height=360 ! comp0.sink_6 \
filesrc location=${VIDEO_IN} ! qtdemux ! vaapih264dec ! gvafpscounter ! vaapipostproc scale-method=fast ! video/x-raw,width=640,height=360 ! comp0.sink_7 \
\
filesrc location=${VIDEO_IN} ! qtdemux ! vaapih264dec ! gvafpscounter ! vaapipostproc scale-method=fast ! video/x-raw,width=640,height=360 ! comp0.sink_8 \
filesrc location=${VIDEO_IN} ! qtdemux ! vaapih264dec ! gvafpscounter ! vaapipostproc scale-method=fast ! video/x-raw,width=640,height=360 ! comp0.sink_9 \
filesrc location=${VIDEO_IN} ! qtdemux ! vaapih264dec ! gvafpscounter ! vaapipostproc scale-method=fast ! video/x-raw,width=640,height=360 ! comp0.sink_10 \
filesrc location=${VIDEO_IN} ! qtdemux ! vaapih264dec ! gvafpscounter ! vaapipostproc scale-method=fast ! video/x-raw,width=640,height=360 ! comp0.sink_11 \
\
filesrc location=${VIDEO_IN} ! qtdemux ! vaapih264dec ! gvafpscounter ! vaapipostproc scale-method=fast ! video/x-raw,width=640,height=360 ! comp0.sink_12 \
filesrc location=${VIDEO_IN} ! qtdemux ! vaapih264dec ! gvafpscounter ! vaapipostproc scale-method=fast ! video/x-raw,width=640,height=360 ! comp0.sink_13 \
filesrc location=${VIDEO_IN} ! qtdemux ! vaapih264dec ! gvafpscounter ! vaapipostproc scale-method=fast ! video/x-raw,width=640,height=360 ! comp0.sink_14 \
filesrc location=${VIDEO_IN} ! qtdemux ! vaapih264dec ! gvafpscounter ! vaapipostproc scale-method=fast ! video/x-raw,width=640,height=360 ! comp0.sink_15
- Assign execute permission to the file:
chmod 755 decode.sh - Execute the decode script:
export DEVICE=/dev/dri/renderD128
export DEVICE_GRP=$(ls -g $DEVICE | awk '{print $3}' | xargs getent group | awk -F: '{print $3}')
docker run -it --rm --net=host \
-e no_proxy=$no_proxy -e https_proxy=$https_proxy \
-e socks_proxy=$socks_proxy -e http_proxy=$http_proxy \
-v /tmp/.X11-unix \
--device /dev/dri --group-add ${DEVICE_GRP} \
-e DISPLAY=$DISPLAY \
-v $HOME/.Xauthority:/home/aibox//.Xauthority:ro \
-v $HOME/Videos:/home/aibox/Videos:ro \
-v $HOME/decode.sh:/home/aibox/decode.sh:ro \
aibox-dlstreamer:3.1.1 /home/aibox/decode.sh
Here is the result:
Sample Usage 3 – OpenVINO Model Benchmark
The following sample shows how to download a model, convert the OpenVINO model, and run a benchmark using the aibox-base-devel: 3.1.1 container.
- In the home directory, create a file openvino_benchmark.sh and add the following code. You may change the model name and target device. In this sample, the model is resnet-50-tf, and the target device is GPU.
#!/bin/bash
MODEL=resnet-50-tf
DEVICE=GPU

omz_downloader --name ${MODEL}
omz_converter --name ${MODEL}

echo "====================================="
echo "Running Benchmark FP32 with ${DEVICE}"
echo "====================================="
cd /home/aibox/public/${MODEL}/FP32
benchmark_app -m ${MODEL}.xml -d ${DEVICE}

echo "====================================="
echo "Running Benchmark FP16 with ${DEVICE}"
echo "====================================="
cd /home/aibox/public/${MODEL}/FP16
benchmark_app -m ${MODEL}.xml -d ${DEVICE}
- Assign execute permission to the file:
chmod 755 openvino_benchmark.sh - Run the following docker command:
docker run -it --rm --net=host \
-e no_proxy=$no_proxy -e https_proxy=$https_proxy \
-e socks_proxy=$socks_proxy -e http_proxy=$http_proxy \
-v /tmp/.X11-unix --device /dev/dri --group-add 110 \
-e DISPLAY=:0 \
-v $HOME/.Xauthority:/home/aibox//.Xauthority:ro \
-v $HOME/openvino_benchmark.sh:/home/aibox/openvino_benchmark.sh:ro \
aibox-base-devel:3.1.1/home/aibox/openvino_benchmark.sh
Here is the sample output:

Known Issues
[AIBOX-254]: VDBoxes are not 100% utilized in video decode and composite benchmarks.
[AIBOX-283]: The xpumanager outputs less data in kernel 6.2+ than in 5.19+.
[AIBOX-293]: Report.zip is empty when you generate the report for the first time to generate the report.
[AIBOX-296]: Failed to install Intel® Edge AI Box version 3.1 over an earlier Intel® Video AI Box version 3.0.
[AIBOX-420]: Permission Issues Found During Installation with new user ID
Troubleshooting
As the system is being automatically updated in the background, you may encounter the following errors:
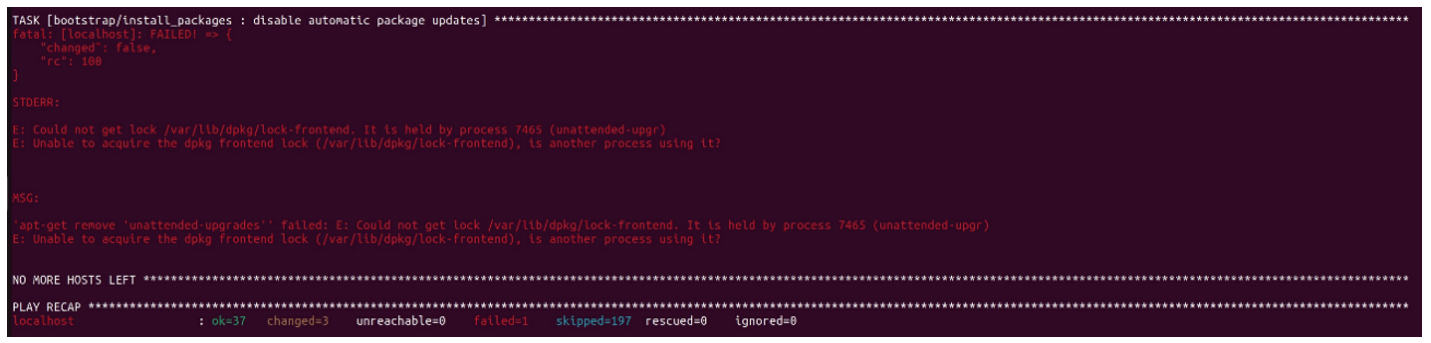

To resolve this issue, reboot and manually update the system. Then, rerun the installation:
sudo reboot
sudo apt update
./edgesoftware install
If you’re unable to resolve your issues, contact the Support Forum.
Release Notes
Current Version: 3.1.1
- Fixed h264 file size issue that causing opencv-ffmpeg BKC validator failed
- Fixed Python binding missing for OpenCV
- Fixed sycl_meta_overlay plugin not found when using aibox_dlstreamer container as base image
- Added locale encoding to fix bmra_base ansible-playbook
- Fixed ESDQ hung error when prompt for user input for "parted"
- Fixed installation failed on headless devices
- Fixed ESDQ Test module error with "-h"
- Fixed ESDQ Test module report generation error
Version: 3.1
- Updated to OpenVINO 2023.1 and 2023.0 (only available in the dlstreamer container)
- Updated to DLStreamer 2023.0
- Updated to OpenCV 4.8.0
- Updated to FFMPEG cartwheel 2023q2
- Updated to GPU driver stack 20230912
- Added CPU and GPU telemetry and observability